Are you ready to dive into the world of cryptocurrency with Solana? Setting up a wallet can seem daunting at first, but fear not! Our Solana wallet setup process walkthrough is here to guide you every step of the way. By following these steps, you’ll not only secure your digital assets but also empower yourself in the ever-evolving landscape of blockchain technology. Join the countless others who have taken this simple yet crucial step toward financial independence.
Read Now : Solana Price Prediction 2025
The Importance of a Solana Wallet Setup Process Walkthrough
Understanding the Solana wallet setup process walkthrough is crucial for anyone who wants to get involved with Solana’s ecosystem. This process is your gateway to exploring one of the fastest-growing blockchain networks, where you can interact with decentralized applications and manage your tokens seamlessly.
Setting up your Solana wallet correctly lays the foundation for a secure and efficient cryptocurrency experience. The process involves choosing the right wallet application, creating a secure account, and safeguarding your private keys—all necessary steps for protecting your digital assets. With the Solana wallet setup process walkthrough, complex-looking steps become effortlessly straightforward.
Moreover, Solana’s speed and affordability make it a popular choice for developers and investors alike. Engaging in the Solana network with confidence means you’re not just securely storing your tokens but also participating in a broader range of opportunities that Solana’s blockchain offers. Our comprehensive Solana wallet setup process walkthrough ensures that you achieve this smoothly and efficiently.
Steps in the Solana Wallet Setup Process Walkthrough
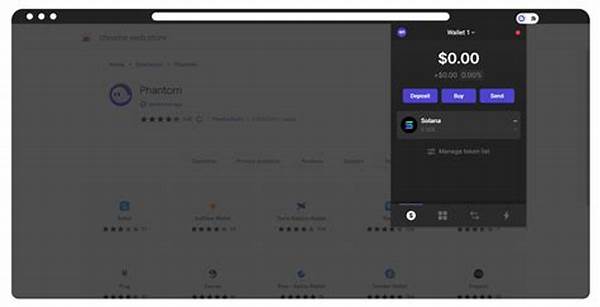
1. Choose a Wallet Provider: The solana wallet setup process walkthrough starts with choosing a reliable wallet provider. Opt for wallets like Phantom or Sollet that offer security and ease of use, setting a solid foundation for your Solana journey.
2. Download and Install: After selecting a wallet, the next step in the Solana wallet setup process walkthrough is downloading and installing the application. Ensure your system meets the necessary requirements for a seamless installation process.
3. Create Your Wallet: Initiate the wallet creation process by following the prompts. During this Solana wallet setup process walkthrough, pay attention to instructions on generating and storing your seed phrase.
4. Secure Your Private Keys: One of the critical steps in the Solana wallet setup process walkthrough is securing your private keys. Without these, you cannot access your funds, emphasizing the importance of storing them safely.
5. Add Solana to Your Wallet: Finally, in the Solana wallet setup process walkthrough, fund your wallet by transferring Solana tokens, allowing you to start your interactions and transactions within the network.
Simplifying the Solana Wallet Setup Process Walkthrough
Getting started with the Solana wallet setup process walkthrough doesn’t have to be a headache. We’ve broken down the steps into easy-to-follow instructions so that even beginners can navigate them with ease. Our guide is designed to simplify the onboarding process, ensuring that you feel comfortable and secure every step of the way.
From the moment you download your selected wallet to when you make your first transaction, our Solana wallet setup process walkthrough provides the support you need. Think of it as having a cryptocurrency expert right by your side. Each step reaffirms the ease with which you can enter the Solana ecosystem, encouraging you to explore new possibilities.
Let us drive away the fear of the unknown with our detailed Solana wallet setup process walkthrough. As you embrace the dynamic world of Solana, rest assured that you have a trusted roadmap guiding your journey towards a rewarding experience in the blockchain space.
Exploring Additional Features in Solana Wallet Setup Process Walkthrough
1. Create Multiple Wallets: The Solana wallet setup process walkthrough allows creating multiple wallets, providing versatility for manipulating transactions and securing different assets.
2. Integrate with DApps: Gain access to decentralized applications with ease, boosting your utility in the Solana wallet setup process walkthrough through seamless integration.
3. Monitor Transactions: Tracking your transactions is made simple via your chosen wallet, enhancing confidence and transparency within the Solana wallet setup process walkthrough.
4. Exchange Tokens Seamlessly: Within the Solana wallet setup process walkthrough, internal exchange mechanisms offer smooth conversion between Solana and other cryptocurrencies.
5. Custom Token Addition: Experience the flexibility of adding custom tokens through a well-structured Solana wallet setup process walkthrough, meeting personalized needs.
Read Now : Avoiding Risks When Sending Sol
6. 2-Factor Authentication: Elevate your security by implementing 2-factor authentication, a key component to ensure peace of mind during the Solana wallet setup process walkthrough.
7. Network Feedback: Engaging in the Solana network efficiently provides valuable feedback, facilitating a rewarding experience as part of the Solana wallet setup process walkthrough.
8. User-friendly Design: Step through a user-centric interface that simplifies the Solana wallet setup process walkthrough and elevates the user experience.
9. Offline Signing: Enhance security with options for offline signing in the Solana wallet setup process walkthrough, keeping your assets even more secure.
10. Mobile Accessibility: Take advantage of mobile solutions that make the Solana wallet setup process walkthrough accessible anywhere, anytime.
Mastering the Solana Wallet Setup Process Walkthrough
Embarking on the Solana wallet setup process walkthrough is your entrance into a world filled with opportunity and innovation. With our guide, not only do you streamline the setup process, but you also unlock the potential to participate actively in one of the most efficient blockchain networks available. This walkthrough ensures you’re not left behind in the rapidly evolving digital ecosystem.
Each step you undertake during the Solana wallet setup process walkthrough brings you closer to effectively managing your cryptocurrency portfolio. You’ll find that setting up the wallet isn’t just about having a secure storage solution; it opens up possibilities for engaging with various applications and digital assets that Solana supports.
Our Solana wallet setup process walkthrough enables you to maximize your interaction with the platform, making complicated processes straightforward and ensuring you are ready to thrive in the digital currency space. Become adept at handling your Solana wallet and gain the confidence to explore a world of decentralized finance and technology.
The Safety Aspect of Solana Wallet Setup Process Walkthrough
Security is at the forefront of any cryptocurrency-related endeavor. The Solana wallet setup process walkthrough prioritizes robust security features that protect your digital assets.
This process begins with educating users about the importance of safeguarding their seed phrases. Our detailed Solana wallet setup process walkthrough provides comprehensive insights into storing and backing up these phrases securely. We guide you through the creation of strong passwords and emphasize the vital role private keys play in maintaining access to your funds.
Furthermore, the Solana wallet setup process walkthrough includes crucial security practices, such as enabling two-factor authentication and regularly updating wallet software. By adhering to these measures, you establish a secure environment for your cryptocurrency activities, ensuring peace of mind while navigating Solana’s promising landscape.
In Conclusion: The Solana Wallet Setup Process Walkthrough
Setting up a Solana wallet is a pivotal step for anyone eager to explore this groundbreaking blockchain platform. Our Solana wallet setup process walkthrough demystifies the process, alleviating potential challenges and ambiguities. It’s a transformative journey toward autonomy and innovation in the world of digital finance.
By following this guide, not only do you equip yourself with a secure wallet but you also empower your ability to participate in the evolving blockchain space. Every step in the Solana wallet setup process walkthrough is designed to provide clarity and assurance, turning what may feel like a daunting task into a straightforward, approachable process. As you embrace this endeavor, you’re setting a foundation for unparalleled growth and opportunity.